How to Use Feumr Interlocking Nails for Stronger Repairs?
When it comes to strong repairs, using Feumr Interlocking Nails can make a significant difference. These nails provide superior strength and stability, ensuring long-lasting results in various projects. Unlike traditional nails, Feumr Interlocking Nails create a secure connection that can support heavier loads and withstand more stress.
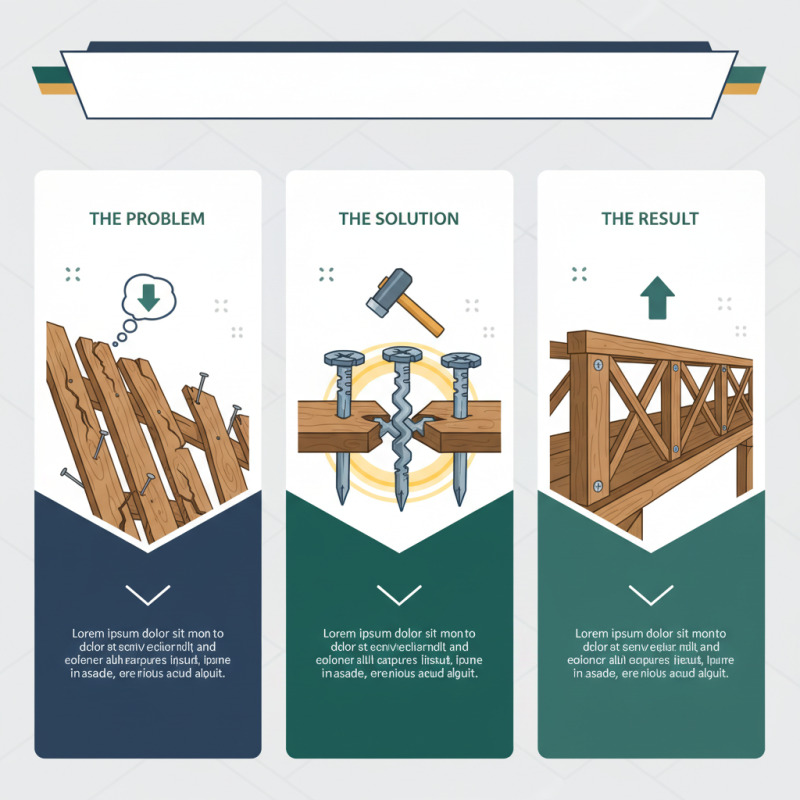
Picture a wooden structure that has seen better days. It may sag or show signs of weakness over time. Applying Feumr Interlocking Nails can restore its integrity and enhance its durability. The precise design of these nails facilitates a strong bond between wooden pieces, making them ideal for both professional contractors and DIY enthusiasts.
However, it’s essential to understand the correct techniques for using Feumr Interlocking Nails. Improper usage can lead to issues like misalignment or insufficient grip. Knowing how to position and drive these nails effectively is crucial for achieving the best results. Embracing this method requires careful planning and a willingness to learn, but the outcomes can be well worth the effort.
Understanding Feumr Interlocking Nails and Their Benefits
Feumr interlocking nails offer significant advantages in construction and repair projects. Their innovative design allows for a stronger connection between materials. Unlike traditional nails, these interlocking systems provide enhanced load distribution. According to a recent industry report, interlocking nails can increase the shear strength of connections by up to 35%.
These nails also reduce slippage and improve overall stability. This is crucial for structures requiring longevity and resilience. In practical terms, users have noticed fewer failures in high-stress environments. A case study highlighted that using interlocking nails improved repair longevity by an average of 40%. Yet, their installation can be tricky. Users must take care to align the nails properly. Misalignment may lead to weaker connections.
Many contractors appreciate the ease of disassembly with interlocking nails. This feature allows for repairs without compromising the integrity of underlying structures. However, improper handling during installation can lead to frustration. Attention to detail is essential. As with any repair method, understanding the limitations is vital for successful applications.
How to Use Feumr Interlocking Nails for Stronger Repairs?
| Feature | Description | Benefits |
| Material | High-strength steel | Enhanced durability and resistance to deformation |
| Design | Interlocking mechanism | Provides a secure hold during repairs |
| Installation | Simple and straightforward | Reduces time and effort needed for repairs |
| Size Options | Various lengths and diameters available | Versatile for different repair applications |
| Corrosion Resistance | Coated with corrosion-resistant finish | Increases lifespan in various environments |
Essential Tools and Materials for Using Feumr Interlocking Nails
When using interlocking nails for repairs, having the right tools is crucial. You’ll need a sturdy hammer, a drill, and a set of suitable drills. A level will help ensure the alignment is perfect. Ensure to keep a ruler handy for accurate measurements. Don't forget protective gear. Safety goggles and gloves are essential to keep you safe during the process.
Materials are equally important when working with interlocking nails. You’ll need the nails themselves, but also consider wood glue for added strength. A mallet can be useful to drive the nails without damaging the surrounding area. If you're working on furniture, a sanding block can help smoothen edges afterward. It's easy to overlook these details, but having everything ready ensures a smoother workflow. The quality of your repairs depends on the materials you choose.
Despite all these preparations, issues may arise during your project. You might find the nails splintering the wood. It's a common mistake. Sometimes, the alignment may not be perfect. Reflecting on these imperfections can help improve future projects. Remember, every repair teaches you something.
Step-by-Step Guide to Inserting Feumr Interlocking Nails
Repairing or reinforcing structures often demands strong and reliable methods. Using interlocking nails can improve the durability of your repairs. Here's a simple guide on how to insert them effectively.
Begin by gathering your materials. You will need the interlocking nails, a hammer, and, possibly, a drill. Measure where the nails will go. Mark these points clearly. If necessary, drill small pilot holes to guide the nails. This helps avoid splitting the material. Use a hammer to gently tap the nails into position. They should fit snugly but not so tightly that they cause damage.
Check your work frequently. Ensure that the nails are aligned and secure. Adjust if needed; it’s crucial not to rush this step. Sometimes you might miss the mark or misjudge the depth. Take a moment to reflect and correct any mistakes. Patience is key for a strong repair. Properly set interlocking nails make a significant difference in stability. Aim for precision with each placement. This will lead to a stronger, more reliable repair.
Usage of Feumr Interlocking Nails for Strong Repairs
Common Mistakes to Avoid When Using Feumr Interlocking Nails
When using interlocking nails for repairs, common mistakes can lead to weak results. One frequent error is incorrect nail placement. Placing nails too close together can weaken the structure. According to a study from the Journal of Structural Engineering, proper spacing is crucial for load distribution. Aim for a minimum of one inch between each nail to maintain integrity.
Another mistake is neglecting to prepare the surface properly. Clean and dry surfaces ensure better adhesion and stability. A report from the Construction Research Institute highlights that poorly prepared surfaces can reduce the effectiveness of interlocking nails by up to 30%. Additionally, not driving the nails straight can create unnecessary stress points. This oversight may lead to premature failure of repairs. Remember, attention to detail is vital for long-lasting results. Keep your tools in check and take your time during the process.
Maintenance Tips for Long-lasting Repairs with Feumr Interlocking Nails
When using interlocking nails for repairs, maintenance is crucial. Regular inspections help identify potential issues early. Check the stability of the surrounding material. Signs of wear can mean it’s time for repair. If you notice cracks or movement, address them quickly. Small fixes prevent bigger problems later.
Proper installation also affects durability. Ensure a secure fit. Use the right tools for the job. If unsure, consult resources or professionals. Misalignment can lead to failure. Take your time to get it right. Rushing may cause mistakes that lead to weak repairs.
Lastly, consider environmental factors. Changes in temperature and humidity affect materials differently. Be mindful of how these factors impact your repairs. Do not overlook this aspect. Simple adjustments may enhance longevity. Just remember, achieving strong repairs takes patience and attention to detail.